
User information, such as Username, Password and User Role, can be edited after a user's creation. This guide will show you all of the information that can be adjusted and how to edit users.
▸ Who Can Edit Users?
The following User Roles have the ability to edit users:
Portal Admin: Can edit users with any role.
Manager: Can edit users with the roles:
- Field User
- User
- All Access Field User
- Customer
- Read-only Manager
Basic Admin: This is the admin role for Vendor accounts, they can edit users with the roles:
- Field User
- User
For a full list of User Roles and Permissions, see the following article: User Roles & Permissions
Table of Contents
- How to Access User Settings
- Types and Saved Views
- Change a User's Password
- Vendors: Restrict Another Company's Types From Users
Access User Settings
1. Click on the Admin (gear) icon in the upper-right corner of the Dashboard, then under Team click Users.
2. Click on the User you wish to modify.
3. Here you can edit user information:
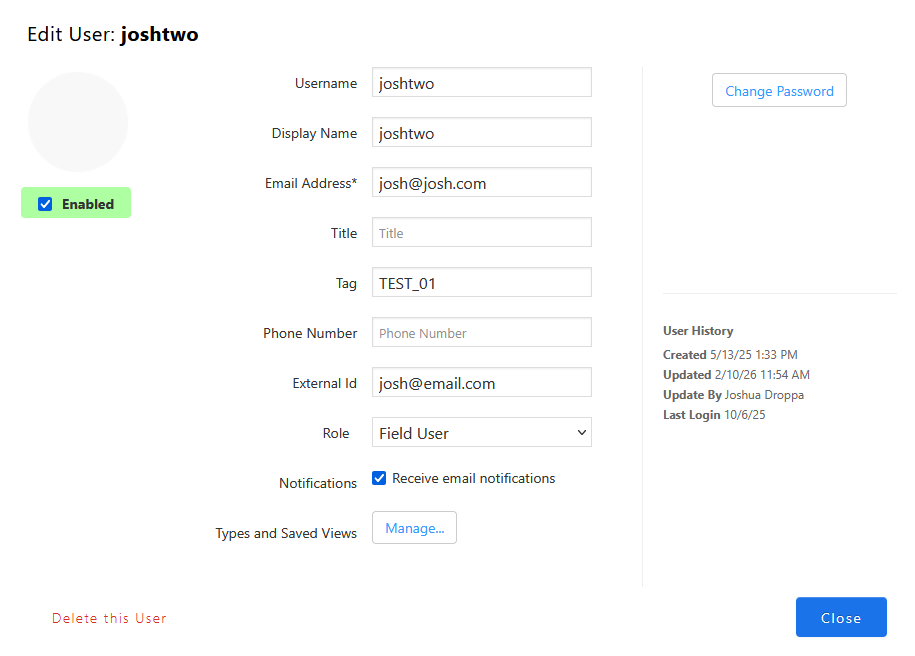
▸ What do These Settings Mean?
Username: The unique identifier of a user within SiteCapture, this is used to log in.
Display Name: The name that will show within your microsite.
Email Address: The e-mail address associated with the user, this is used for password recovery and notifications.
Title: You can associate a title with users to display on your site, such as 'Project Manager'.
Tag: A unique identifier that can apply to multiple users on your site, this can be used for project assignment. See: Easily Assign and Share to a User Group.
Phone Number: You can include an associated phone number for a user.
External Id: An additional identifier for users, this can be used for integrations.
Role: The user's permission level within your microsite. See: User Roles & Permissions
4. To Change a User's Password, click Change Password. Enter the user's new password, then click Change Password again to Confirm.
5. You can also view user history such as when the user was created, and updated, who updated the user, and their last login date.
6. You can view the user's app version and last login date on the user list page.
Types and Saved Views
You can adjust the Types and Views a user is able to see, as well as the the view they will see when logging into SiteCapture on Mobile. To edit a users types and saved views, follow the below steps.
Video: Types and Saved Views
1. Next to Types and Saved Views, Click Manage.
2. Select the User's Types.
If you wish to limit the types the user can see, select Can see only selected Types... and then select the types you want the user to see. See this article for more information on types: Creating, Editing & Deleting Types
3. Select the User's Views.
If you wish to limit the views the user can see, select Can see only selected Views... and then select the views you want the user to see. See this article for more information on views: Advanced Search: Creating, Deleting, & Refreshing Views
4. Select the User's Mobile View
You can also adjust the views a user will see on mobile, when you select a mobile view it will show projects on the mobile app regardless of the selected Type or Saved View. Click the drop-down menu under Mobile View and select the view you want the user to see on mobile. See this article for more information on views: Advanced Search: Creating, Deleting, & Refreshing Views
Vendors: Restrict Another Company's Types From Users
This section is for a vendor who is also a customer. Follow these steps to restrict users from seeing another company's templates when creating projects, based on their assigned types.
1. Contact SiteCapture Support to Enable the Feature.
To enable this functionality, please contact support@sitecapture.com. They will be able to enable the “Hide client types when user has type restrictions” setting for you.
2. Click on the Admin (gear) icon in the upper-right corner of the Dashboard, then under Team click Users.
3. Find the user you’d like to restrict. Click on the display name to open their user settings.
4. In the user profile click “Manage” next to Types and Saved Views.
5. Restrict the User to Specific Types.
In the Types section, check "Can only see selected types" and select the types that this user should have access to. Click "Close" and then click "Save" to apply the restriction.
6. Project Creation is Restricted.
Now, when the restricted user signs in via the mobile app or web app and clicks “Create Project,”
they will only see project templates associated with their assigned types. Any client-specific templates outside of their allowed types will no longer be visible.
Comments